Quickstart
This document gives you a quick view on the basic usage of Submarine platform. You can finish each step of ML model lifecycle on the platform without messing up with the troublesome environment problems.
Installation
Prepare a Kubernetes cluster
- Prerequisite
- Check dependency page for the compatible version
- kubectl
- helm (Helm v3 is minimum requirement.)
- minikube.
- istioctl
- Start minikube cluster and install Istio
Start minikube
# You can go to https://minikube.sigs.k8s.io/docs/start/ and follow the tutorial to install minikube.
# Then you can start kubernetes with minikube:
minikube start --vm-driver=docker --cpus 8 --memory 8192 --kubernetes-version v1.24.12

# The version of k8s can be adjusted to the range of your current minikube.
# For example, minikube v1.28.0 can provide versions from v1.25.0 to v1.25.3 in k8s 1.25

# Or if you want to support Pod Security Policy (https://minikube.sigs.k8s.io/docs/tutorials/using_psp) in k8s 1.21 or 1.22, you can use the following command to start cluster
minikube start --extra-config=apiserver.enable-admission-plugins=PodSecurityPolicy --addons=pod-security-policy --vm-driver=docker --cpus 8 --memory 8192 --kubernetes-version v1.21.2
Install Istio, there are two ways to install: Command-Istioctl-based, or Helm-based
# You can go to the https://github.com/istio/istio/releases/ to download the istioctl for your k8s version
# e.g. we can execute the following command to download the istio version adapted to k8s 1.24.12
# wget https://github.com/istio/istio/releases/download/1.17.1/istio-1.17.1-linux-amd64.tar.gz
istioctl install -y

# Alternatively, you can use istio's helm to install
# This is the link: https://istio.io/latest/docs/setup/install/helm/
## Add istio repo
helm repo add istio https://istio-release.storage.googleapis.com/charts
helm repo update
## Create istio-system namespace
kubectl create namespace istio-system
## Install istio resources
helm install istio-base istio/base -n istio-system
helm install istiod istio/istiod -n istio-system
helm install istio-ingressgateway istio/gateway -n istio-system
Launch submarine in the cluster
- Clone the project
git clone https://github.com/apache/submarine.git
cd submarine
- Create necessary namespaces
# create namespace for submarine, training, notebook and seldon-core operators
kubectl create namespace submarine
kubectl label namespace submarine istio-injection=enabled

# create namespace for deploying submarine-server
kubectl create namespace submarine-user-test
kubectl label namespace submarine-user-test istio-injection=enabled

# After k8s 1.25, we can turn on PSA (Pod Security Admission) labels for namespace.
# We use a common PSA enforcement level. If you want to use a more detailed configuration, you can refer to
# https://kubernetes.io/docs/concepts/security/pod-security-admission/#pod-security-admission-labels-for-namespaces
kubectl label namespace submarine-user-test 'pod-security.kubernetes.io/enforce=privileged'
- Install the submarine operator and dependencies by helm chart
# Update helm dependency.
helm dependency update ./helm-charts/submarine
# Install submarine operator in namespace submarine.
helm install submarine ./helm-charts/submarine --set seldon-core-operator.istio.gateway=submarine/seldon-gateway -n submarine
- Create a Submarine custom resource and the operator will create the submarine server, database, etc. for us.
kubectl apply -f submarine-cloud-v3/config/samples/_v1_submarine.yaml -n submarine-user-test
Ensure submarine is ready
$ kubectl get pods -n submarine
NAME                                              READY   STATUS    RESTARTS   AGE
notebook-controller-deployment-66d85984bf-x562z   1/1     Running   0          7h7m
training-operator-6dcd5b9c64-nxwr2                1/1     Running   0          7h7m
submarine-operator-9cb7bc84d-brddz                1/1     Running   0          7h7m

$ kubectl get pods -n submarine-user-test
NAME                                     READY   STATUS    RESTARTS   AGE
submarine-database-0                     1/1     Running   0          7h6m
submarine-minio-686b8777ff-zg4d2         2/2     Running   0          7h6m
submarine-mlflow-68c5559dcb-lkq4g        2/2     Running   0          7h6m
submarine-server-7c6d7bcfd8-5p42w        2/2     Running   0          9m33s
submarine-tensorboard-57c5b64778-t4lww   2/2     Running   0          7h6m
Connect to workbench
- Exposing service
kubectl port-forward --address 0.0.0.0 -n istio-system service/istio-ingressgateway 32080:80
- View workbench
Go to http://0.0.0.0:32080

Example: Submit a mnist distributed example
We put the code of this example here. train.py is our training script, and build.sh is the script to build a docker image.
1. Write a python script for distributed training
Take a simple mnist tensorflow script as an example. We choose MultiWorkerMirroredStrategy as our distributed strategy.
"""
./dev-support/examples/quickstart/train.py
Reference: https://github.com/kubeflow/training-operator/blob/master/examples/tensorflow/distribution_strategy/keras-API/multi_worker_strategy-with-keras.py
"""

import tensorflow as tf
import tensorflow_datasets as tfds
from packaging.version import Version
from tensorflow.keras import layers, models

import submarine


def make_datasets_unbatched():
    BUFFER_SIZE = 10000

    # Scaling MNIST data from (0, 255] to (0., 1.]
    def scale(image, label):
        image = tf.cast(image, tf.float32)
        image /= 255
        return image, label

    # If we use tensorflow_datasets > 3.1.0, we need to disable GCS
    # https://github.com/tensorflow/datasets/issues/2761#issuecomment-1187413141
    if Version(tfds.__version__) > Version("3.1.0"):
        tfds.core.utils.gcs_utils._is_gcs_disabled = True
    datasets, _ = tfds.load(name="mnist", with_info=True, as_supervised=True)

    return datasets["train"].map(scale).cache().shuffle(BUFFER_SIZE)


def build_and_compile_cnn_model():
    model = models.Sequential()
    model.add(layers.Conv2D(32, (3, 3), activation="relu", input_shape=(28, 28, 1)))
    model.add(layers.MaxPooling2D((2, 2)))
    model.add(layers.Conv2D(64, (3, 3), activation="relu"))
    model.add(layers.MaxPooling2D((2, 2)))
    model.add(layers.Conv2D(64, (3, 3), activation="relu"))
    model.add(layers.Flatten())
    model.add(layers.Dense(64, activation="relu"))
    model.add(layers.Dense(10, activation="softmax"))

    model.summary()

    model.compile(optimizer="adam", loss="sparse_categorical_crossentropy", metrics=["accuracy"])

    return model


def main():
    strategy = tf.distribute.experimental.MultiWorkerMirroredStrategy(
        communication=tf.distribute.experimental.CollectiveCommunication.AUTO
    )

    BATCH_SIZE_PER_REPLICA = 4
    BATCH_SIZE = BATCH_SIZE_PER_REPLICA * strategy.num_replicas_in_sync

    with strategy.scope():
        ds_train = make_datasets_unbatched().batch(BATCH_SIZE).repeat()
        options = tf.data.Options()
        options.experimental_distribute.auto_shard_policy = (
            tf.data.experimental.AutoShardPolicy.DATA
        )
        ds_train = ds_train.with_options(options)
        # Model building/compiling need to be within `strategy.scope()`.
        multi_worker_model = build_and_compile_cnn_model()

    class MyCallback(tf.keras.callbacks.Callback):
        def on_epoch_end(self, epoch, logs=None):
            # monitor the loss and accuracy
            print(logs)
            submarine.log_metric("loss", logs["loss"], epoch)
            submarine.log_metric("accuracy", logs["accuracy"], epoch)

    multi_worker_model.fit(ds_train, epochs=10, steps_per_epoch=70, callbacks=[MyCallback()])
    # save model
    submarine.save_model(multi_worker_model, "tensorflow")


if __name__ == "__main__":
    main()
2. Prepare an environment compatible with the training
Build a docker image equipped with the requirement of the environment.
eval $(minikube docker-env)
./dev-support/examples/quickstart/build.sh
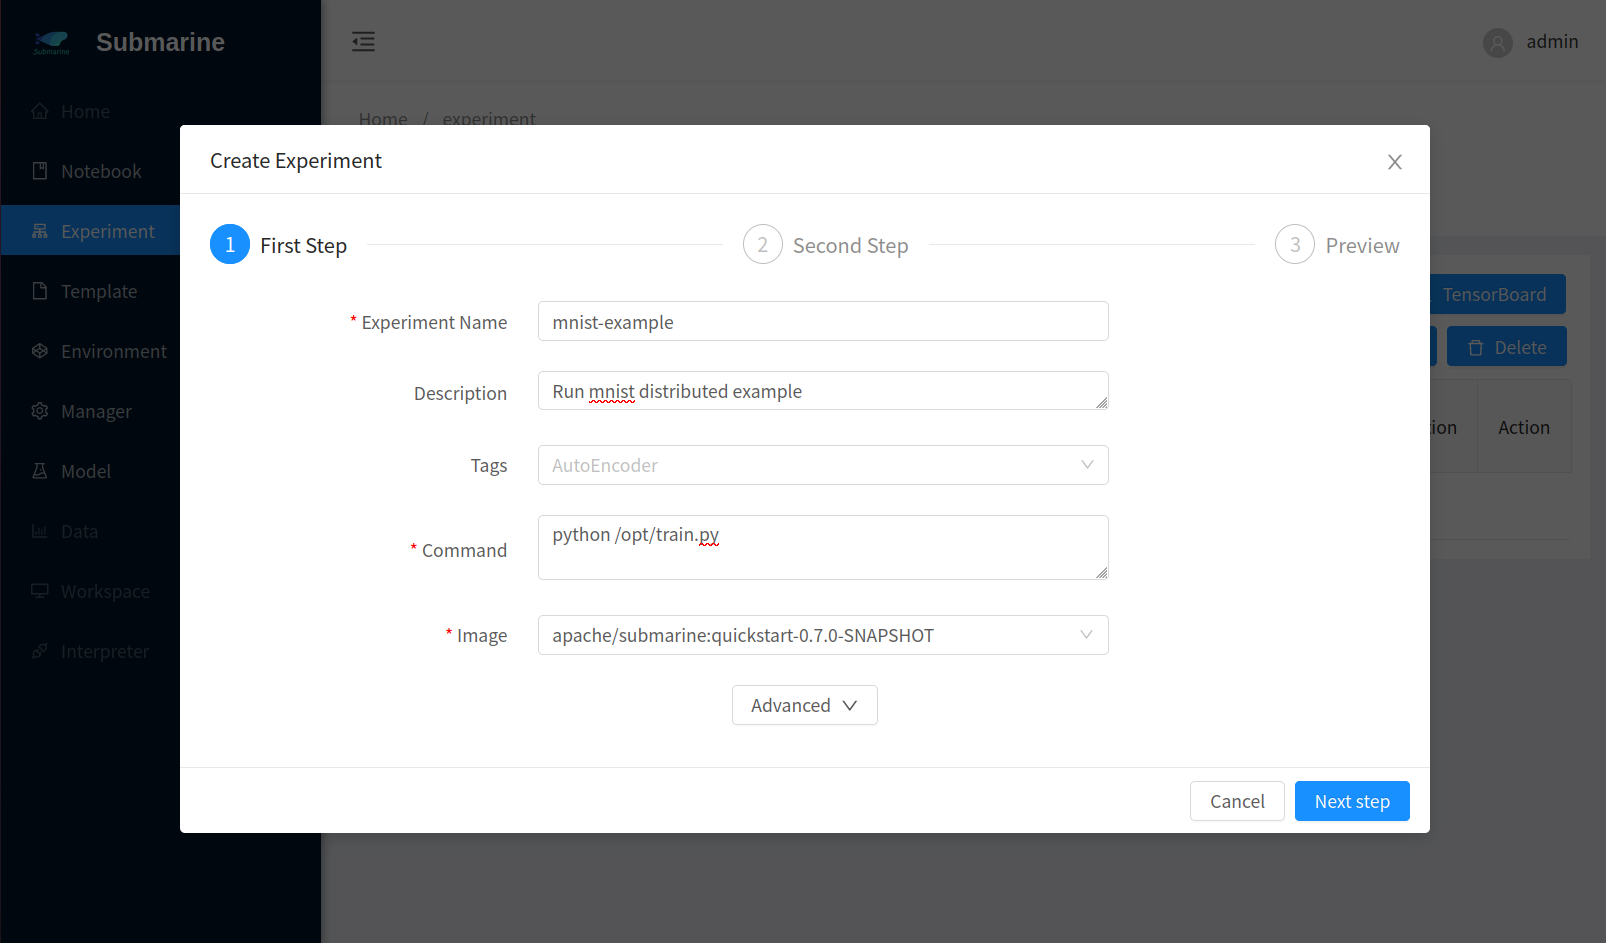
3. Submit the experiment
Open submarine workbench and click
+ New ExperimentChoose
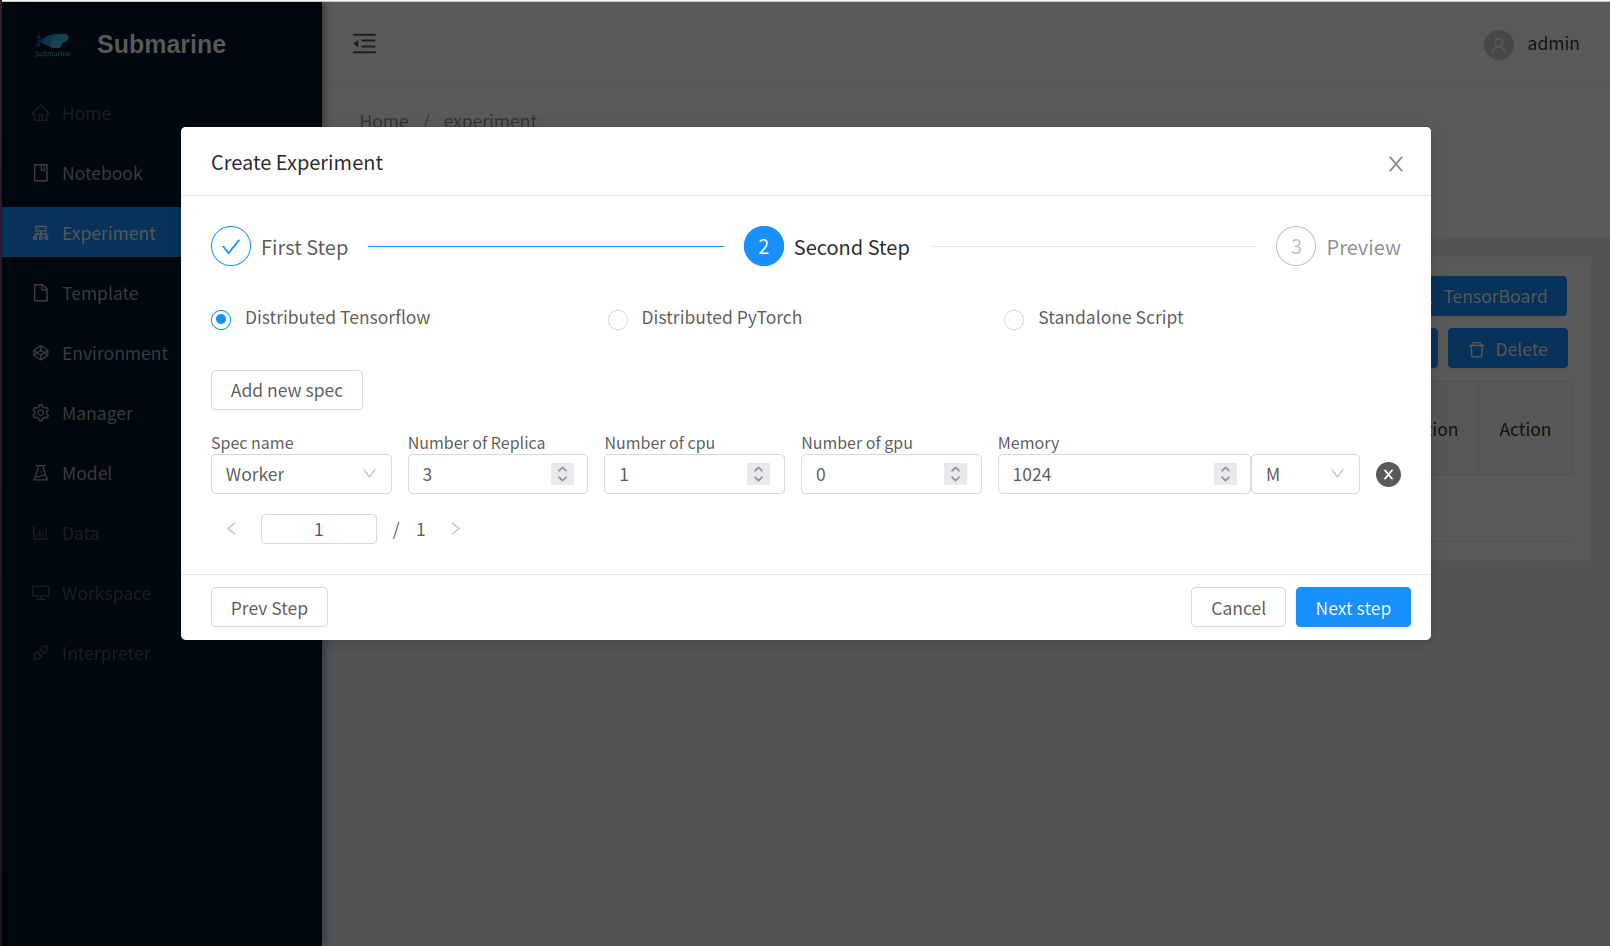
Define your experimentFill the form accordingly. Here we set 3 workers.
- Step 1
- Step 2
- Step 3
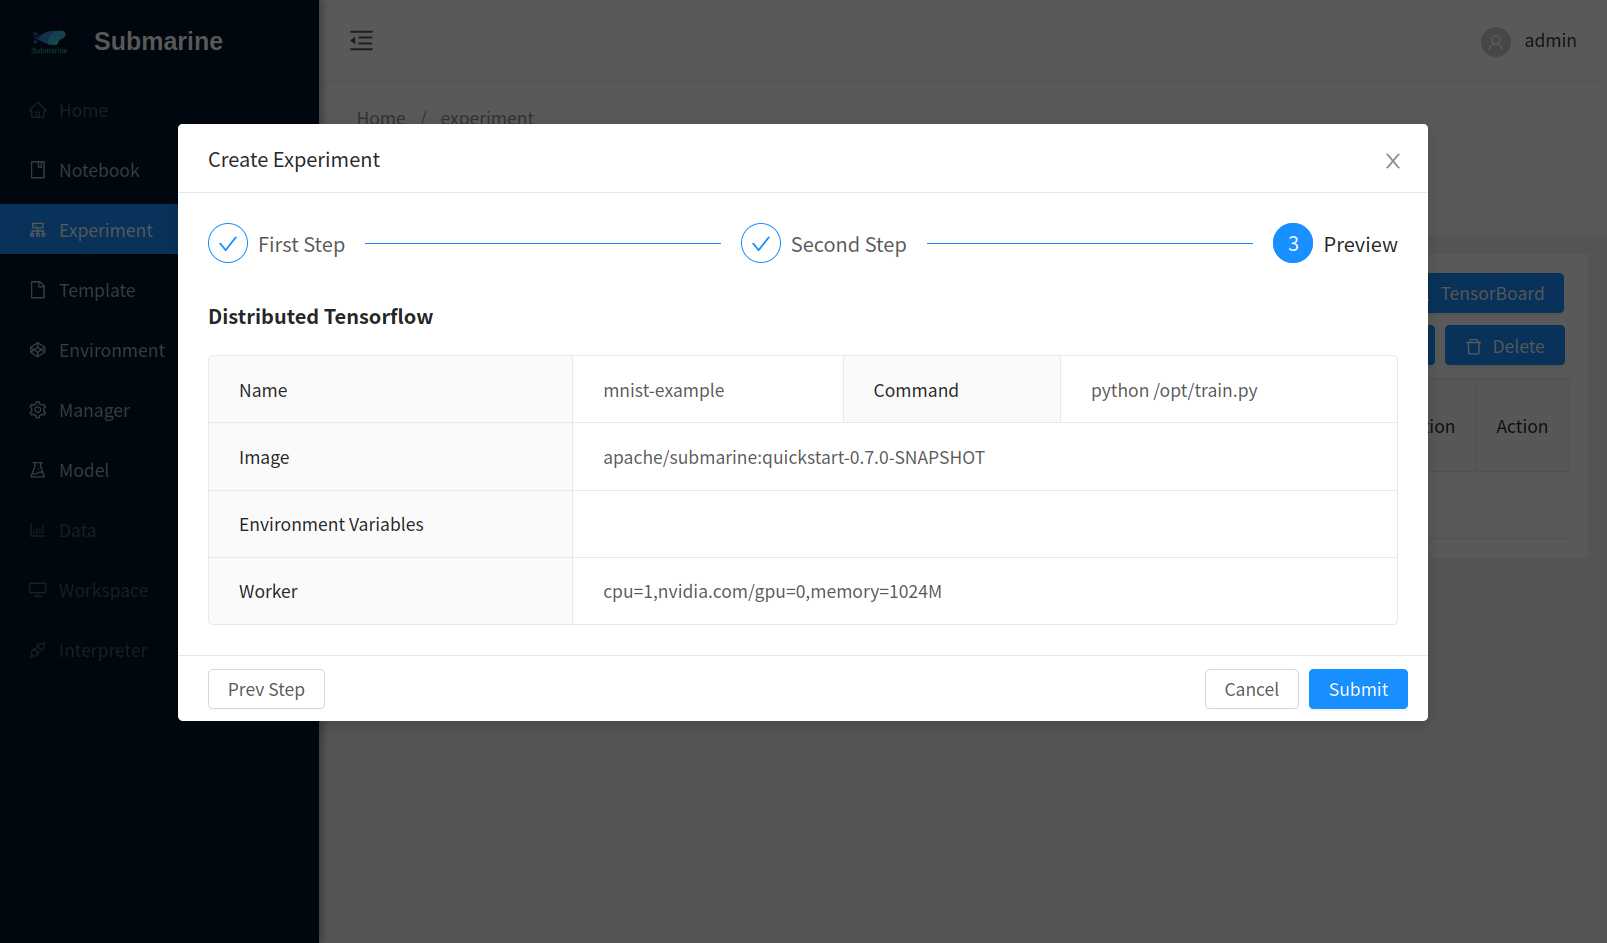
- The experiment is successfully submitted
- Step 1
In the meantime, we have built this image in docker hub and you can run this experiment directly if you choose
quickstartinFrom predefined experiment library.
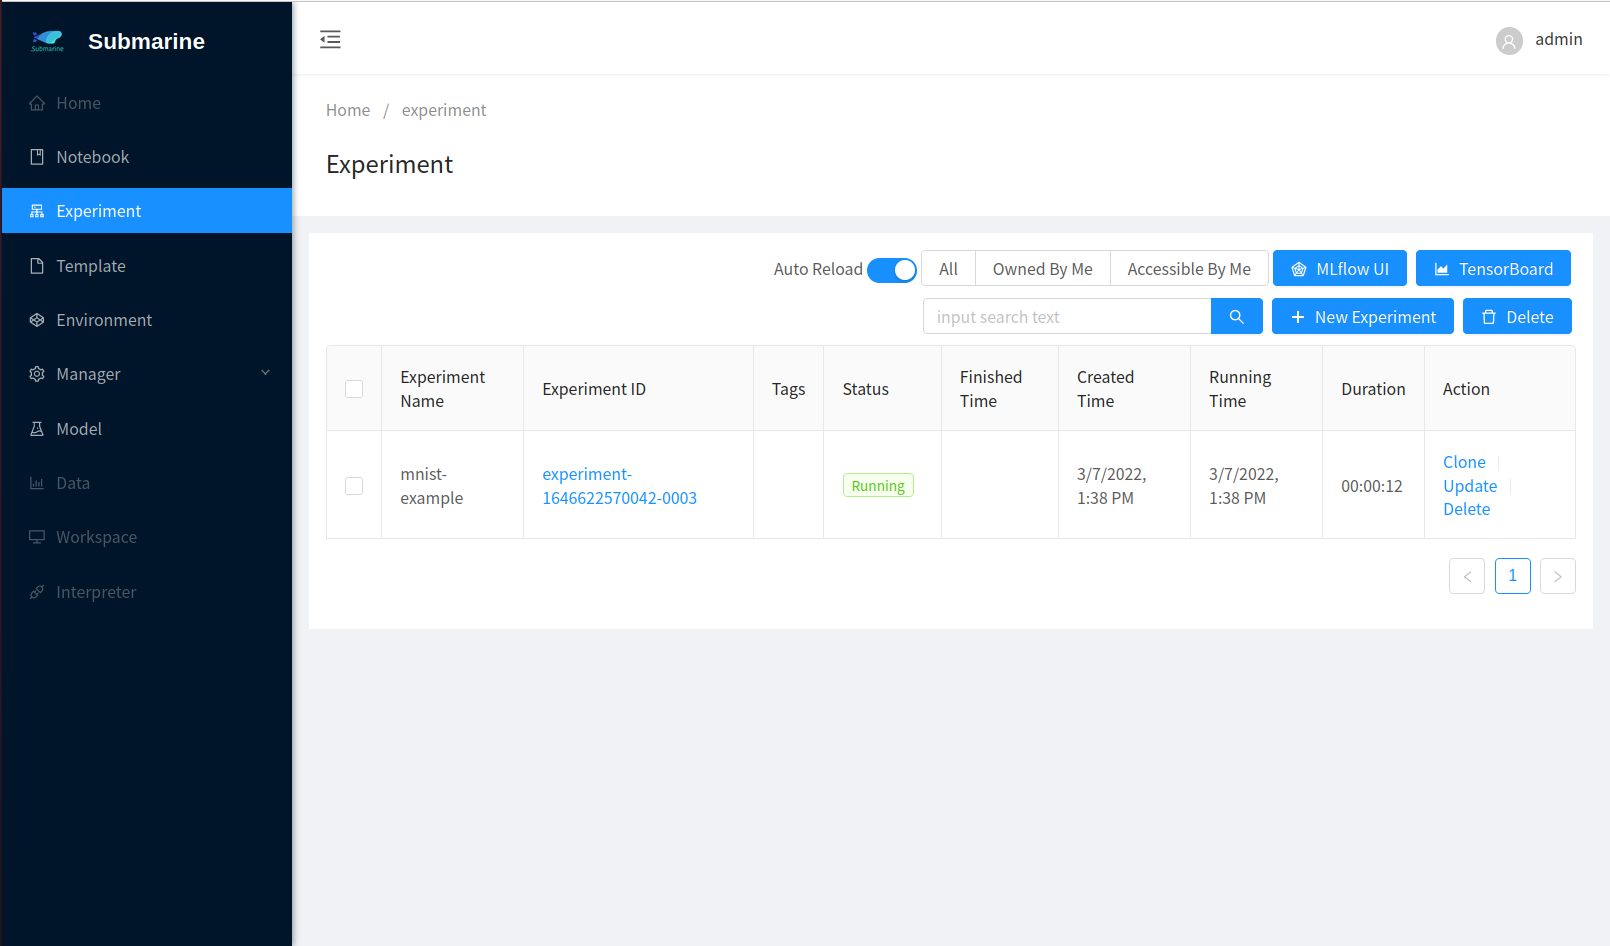
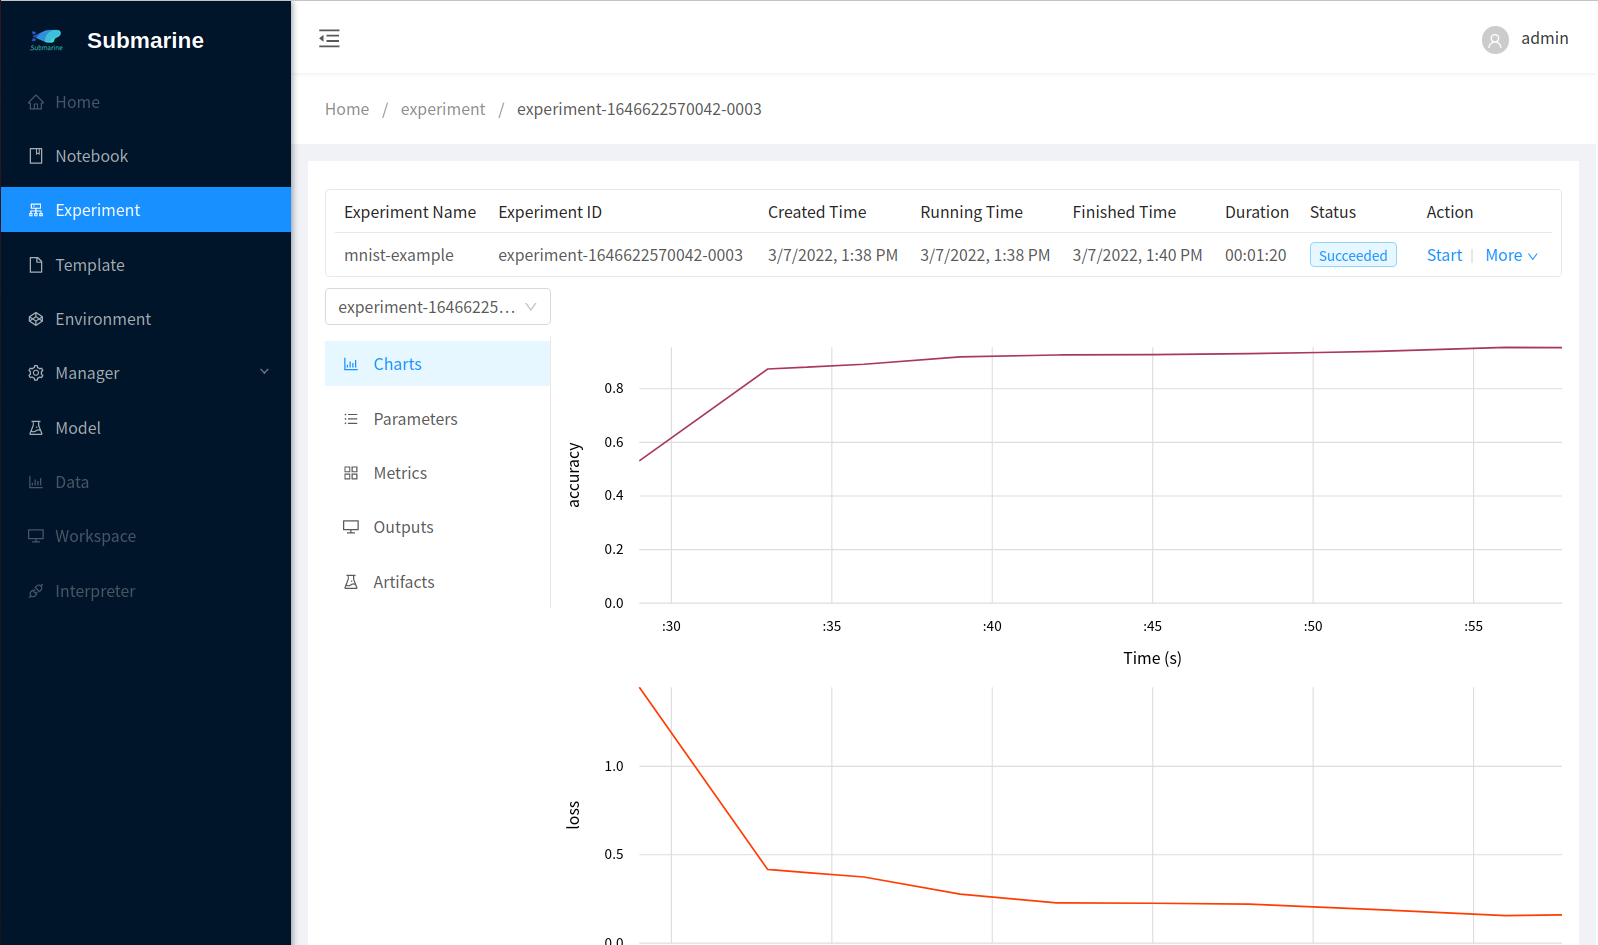
4. Monitor the process
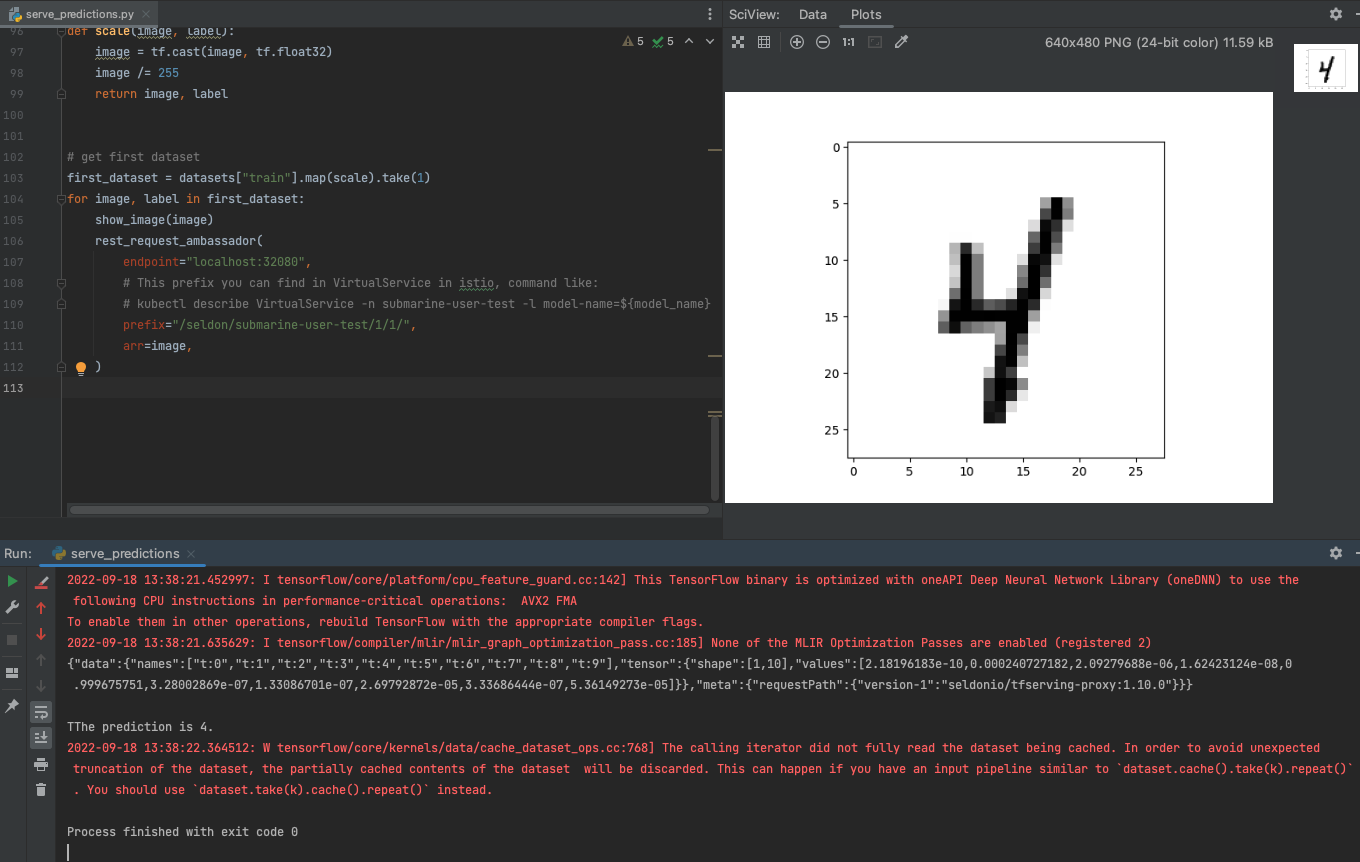
- In our code, we use
submarinefromsubmarine-sdkto record the metrics. To see the result, click corresponding experiment with namemnist-examplein the workbench. - To see the metrics of each worker, you can select a worker from the left top list.
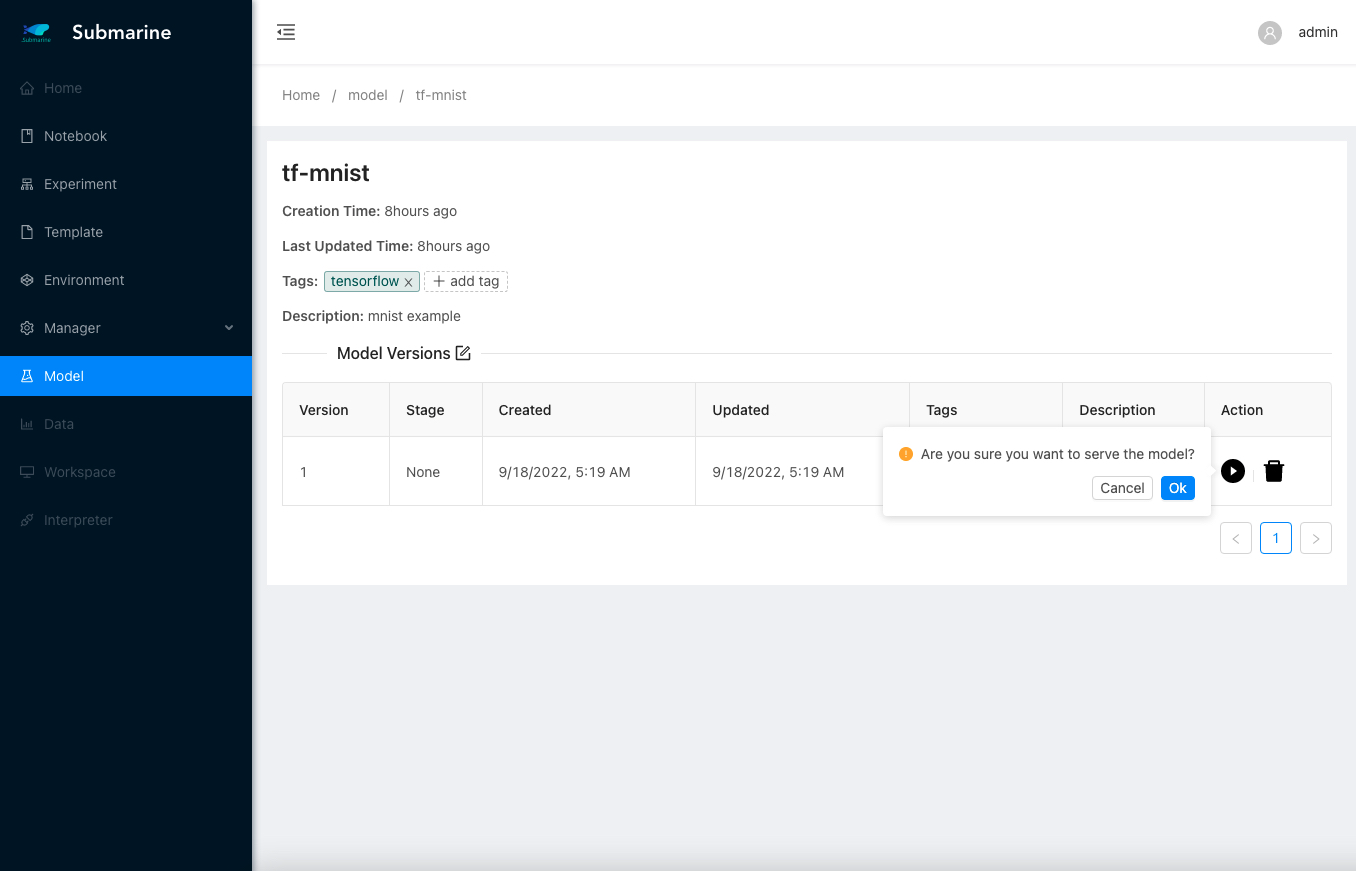
5. Serve the model
- Before serving, we need to register a new model.
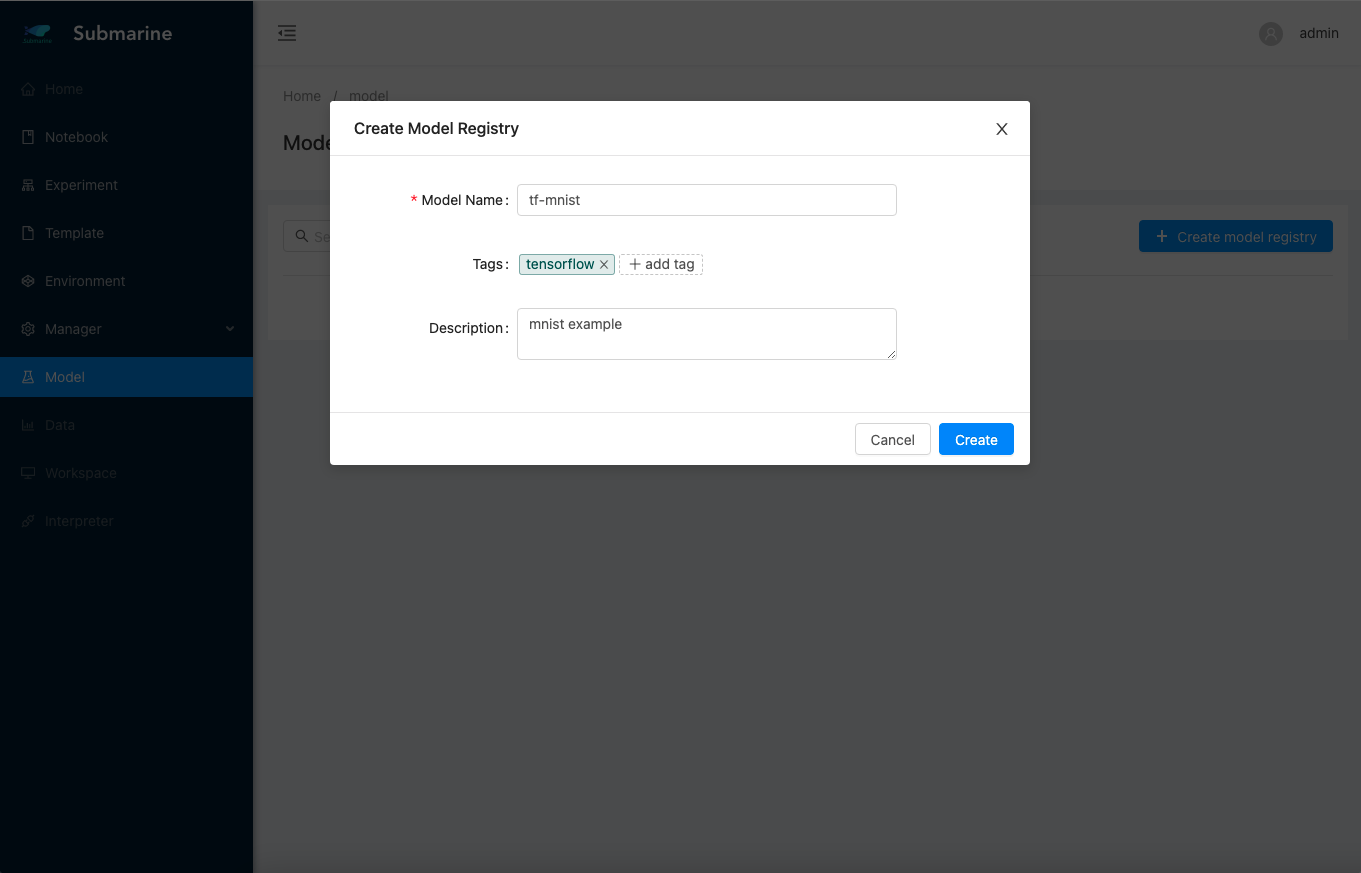
- And then, check the output model in experiment page.
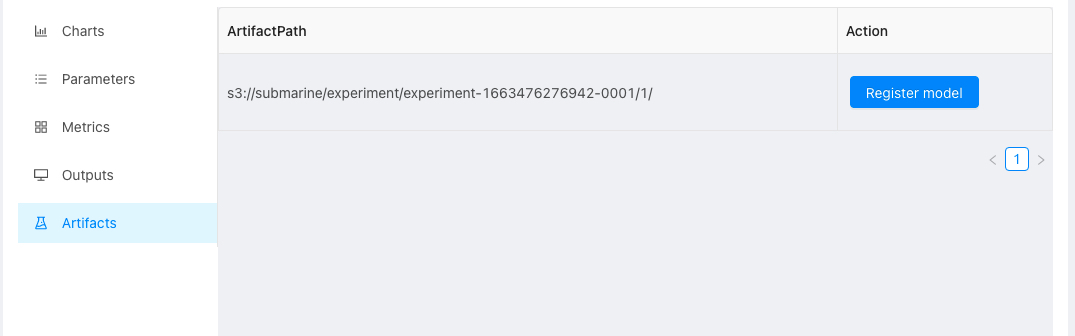
- Click the button and register the model.
- Go to the model page and deploy our model for serving.
- We can run the following commands to get the
VirtualServiceandEndpointthat use istio for external port forward or ingress.
## get VirtualService with your model name
kubectl describe VirtualService -n submarine-user-test -l model-name=tf-mnist

Name:         submarine-model-1-2508dd65692740b18ff5c6c6c162b863
Namespace:    submarine-user-test
Labels:       model-id=2508dd65692740b18ff5c6c6c162b863
              model-name=tf-mnist
              model-version=1
Annotations:  <none>
API Version:  networking.istio.io/v1beta1
Kind:         VirtualService
Metadata:
  Creation Timestamp:  2022-09-18T05:26:38Z
  Generation:          1
  Managed Fields:
    ...
Spec:
  Gateways:
    submarine/seldon-gateway
  Hosts:
    *
  Http:
    Match:
      Uri:
        Prefix:  /seldon/submarine-user-test/1/1/
    Rewrite:
      Uri:  /
    Route:
      Destination:
        Host:  submarine-model-1-2508dd65692740b18ff5c6c6c162b863
        Port:
          Number:  8000
Events:            <none>
To confirm that the serving endpoint is available, try using the swagger address to confirm the availability of the interface. In our example, the address of the swagger is: http://localhost:32080/seldon/submarine-user-test/1/1/api/v1.0/doc/
More details can be found in the official seldon documentation: https://docs.seldon.io/projects/seldon-core/en/latest/workflow/serving.html#generated-documentation-swagger-ui
- After successfully serving the model, we can test the results of serving using the test python code serve_predictions.py